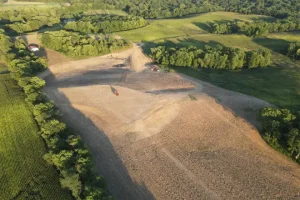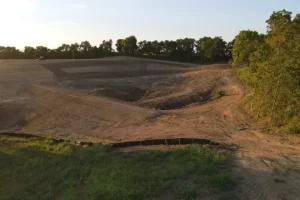

From Dirt to Deep Water: Mapping the Pond Construction Process
Ever wonder why some ponds stay full and trouble-free for decades while others leak or erode after a few Midwest freeze-thaw cycles, spring floods, or long Texas dry spells?
Or why building a pond is a lot more involved than digging a hole and hoping rain does the rest?
In this post, you will learn the pond construction process step by step, from site evaluation and design through excavation, sealing, and long-term planning.
By the end, you will understand how a properly planned pond is built to hold water, resist erosion, and perform reliably for years, saving you time, money, and frustration down the road.
If you are thinking about acreage pond installation and want expert guidance from the start, reach out to Bulletproof Pond & Lake by calling or filling out the contact form.
A quick conversation can help you avoid costly mistakes and figure out what will actually work on your property.
What Is the Pond Construction Process?
The pond construction process involves planning, designing, building, and stabilizing a pond so it can hold water long-term without constant repairs.
While every property is different, most successful pond construction projects follow the same core phases, in the right order, to reduce risk and protect the future dam.
At a high level, the process includes:
- Evaluating the pond area, soil, slope, and water supply
- Designing the pond shape, depth, and volume based on goals
- Completing permitting and erosion planning
- Excavation and earthwork
- Building and sealing the dam using an impervious layer
- Installing spillways, pipes, and drains
- Shaping pond edges and stabilizing the surface
- Filling the pond and monitoring the water level
- Planning for long-term maintenance and sediment control
Skipping or rushing any of these steps often leads to pond excavation mistakes, water seepage, erosion, or a pond that never fully holds water.
Step 1: Site Evaluation and Feasibility Planning
This step determines whether building a pond makes sense on your land before any excavation begins.
Many pond failures trace back to choosing the wrong spot for a pond rather than poor construction.
Evaluating Natural Drainage and Topography
A pond must sit in the right position on the ground to function properly.
Key factors to evaluate include:
- Natural low points where water already collects
- How surface water flows across the land during heavy rain
- Where streams, rivers, or drainage channels enter and exit
- The size of the watershed feeding the pond area
Avoid sites that rely only on rainfall with no reliable runoff.
Large ponds need a consistent water supply to maintain a stable water level.
Soil Testing and Water Retention Analysis
Soil is one of the most important factors in pond construction.
Testing typically includes:
- Digging test holes to evaluate clay content
- Checking for sand, gravel, fractured rock, or loose fill
- Determining whether native soil can form an impervious layer
- Identifying areas prone to water seepage
Clay-rich soil is ideal for building a pond because it compacts tightly and helps hold water.
Sandy soil or ground with excessive gravel often requires sealing strategies or makes the site unsuitable.
Assessing Property Access and Construction Constraints
Access affects both cost and timeline.
Planners evaluate:
- Equipment access for machinery and excavation
- Areas needed for staging, spoil placement, and material stockpiles
- Existing trees, vegetation, fences, or structures
- Slopes that complicate earthmoving
Poor access can increase construction time, equipment needs, and the overall job complexity.
Step 2: Pond Design and Engineering
Design decisions shape how the pond performs for decades.
A good design balances stability, function, and maintenance.
Determining Pond Size, Depth, and Shape
The pond size and volume must match the available watershed and water supply.
Design considerations include:
- Matching pond area to runoff capacity
- Selecting appropriate water depth for climate and use, particularly in hot summers where evaporation is a real concern across Texas, Oklahoma, and Kansas
- Establishing the deepest point to reduce evaporation and silt buildup
- Designing a shape that supports stable slopes
Designing for stability is more important than appearance.
Steep sides may look clean, but they increase erosion and future repairs.
Designing for Intended Use
How the pond will be used drives many design decisions.
Common uses include:
- Fishing ponds with varied depth and fish habitat
- Wildlife ponds with shallow shelves and aquatic plants
- Retention pond designs focused on runoff control
- Small pond or backyard pond designs with limited volume
Features like shelves, deep zones, and pond edges are planned early so they are built correctly during excavation.
Spillway and Water Control Design
Water control protects the dam during storms.
Design planning includes:
- Primary spillway sizing and pipe placement
- Emergency spillway location and elevation
- Managing flowing water during extreme rain events
- Protecting the future dam from overtopping
This step is essential for long-term safety and performance.
Step 3: Permitting and Pre-Construction Planning
Permitting affects when construction can begin and how it proceeds.
Identifying Required Permits
Permits may be required based on:
- Pond size and depth
- Amount of ground disturbed
- Dam height and volume
- Impact on streams, rivers, or downstream properties
Large ponds and retention pond projects often trigger additional review, which makes understanding the permitting process for pond construction essential.
Environmental and Erosion Control Planning
Before excavation starts, plans are made to manage soil movement.
This includes:
- Temporary erosion controls
- Sediment barriers to protect nearby land
- Drainage routing during construction
- Protecting surface water from debris and silt
Good planning here prevents delays and protects the surrounding ground.
Step 4: Excavation and Earthmoving
Excavation is the most visible part of pond building, but not the most critical.
Clearing and Stripping Topsoil
Work begins by:
- Removing trees and vegetation from the pond footprint
- Stripping and stockpiling topsoil for later use
- Exposing stable subsoil for construction
Saving topsoil helps with erosion control and plant growth later.
Basin Excavation and Grading
The pond basin is excavated according to design.
This includes:
- Excavating to planned depth and volume
- Shaping slopes for stability
- Creating shelves and transitions
- Sequencing excavation to support dam construction
Heavy machinery and equipment are used carefully to avoid overdisturbing the ground.
Step 5: Core Trench and Pond Sealing
This is the most essential structural step in the pond construction process.
Core Trench Purpose and Placement
The core trench creates a watertight barrier inside the dam.
Its purpose is to:
- Block water seepage beneath the dam
- Tie the dam into stable clay soil
- Protect against internal erosion
Without a proper core trench, even well-shaped ponds can fail, which highlights the critical role of a core trench for a pond.
Core Trench Excavation and Compaction
Core trenches are:
- Excavated down to stable clay layers
- Filled in compacted lifts
- Built with strict moisture and compaction control
Poor compaction creates hidden channels where water can escape.
Supplemental Sealing Methods
In some cases, additional sealing is required.
Options may include:
- Bentonite mixed into soil
- Installing a pond liner in limited areas
- Using clay blankets to reinforce the impervious layer
Liners and pond liner systems are more common in small pond projects.
Large ponds typically rely on native clay and compaction.
Step 6: Dam Construction and Structural Stability
The dam determines whether the pond survives long-term weather cycles.
Building the Dam in Compacted Lifts
Dams are constructed by:
- Placing soil in thin layers
- Compacting each lift thoroughly
- Maintaining moisture control
This prevents settlement and internal failure.
Slope Design and Safety Factors
Proper slope design:
- Reduces erosion on dam faces
- Improves vegetation establishment
- Lowers maintenance needs
Both upstream and downstream slopes are engineered for stability.
Step 7: Spillway and Overflow Installation
Water must have a safe path out of the pond.
Emergency Spillway Construction
Emergency spillways:
- Are placed at a controlled elevation
- Use rock or armored channels
- Prevent washouts during extreme events
Primary Overflow Systems
Primary systems include:
- Pipes and drains through the dam
- Controlled outlets for managing water level
- Protection against debris blockage
Together, these systems protect the dam and downstream land.
Step 8: Shoreline Shaping and Erosion Protection
This phase prepares the pond for filling.
Final Grading and Edge Shaping
Final shaping focuses on:
- Gentle pond edges
- Stable slopes near the surface
- Smooth transitions between zones
Erosion Control and Vegetation
Stabilization includes:
- Reapplying topsoil
- Establishing grass or native plants
- Adding rock where flowing water is expected
Aquatic plants like water lilies may be added later to improve habitat and water quality.
Step 9: Filling the Pond and Performance Testing
Filling is an active monitoring phase.
Controlled Filling and Leak Monitoring
As the pond begins to fill:
- Soil hydrates and seals
- Water level is monitored over time
- Early seepage issues are identified
Filling too fast can hide problems.
Initial Water Quality Considerations
Early management includes:
- Monitoring pH and clarity
- Managing suspended soil and silt
- Allowing the pond to stabilize before adding fish
Typical Pond Construction Timeline
Timelines vary based on size and conditions, which is why knowing how long it takes to build a pond
helps set realistic expectations.
Typical phases include:
- Planning and permitting phase
- Active construction window
- Weather-related delays
- Time required to reach full pool
Large ponds often take longer due to volume and soil conditions.
Pond Construction Cost Factors
Pricing varies widely across projects.
Size, Depth, and Soil Conditions
Costs are driven by:
- Excavation volume
- Clay content and sealing complexity
- Dam height and length
Access, Topography, and Spoil Management
Difficult access increases:
- Equipment needs
- Hauling and material relocation
- Labor time
Optional Features and Upgrades
Extras may include:
- Shoreline rock
- Peninsulas or islands
- Wetland forebays
Planning for Long-Term Pond Maintenance
Construction decisions affect lifetime costs.
Sediment and Muck Management Planning
Designing for maintenance includes:
- Planning clean-out intervals
- Preserving access points
- Managing debris and sediment buildup
Dam and Spillway Inspections
Routine inspections focus on:
- Monitoring erosion
- Managing vegetation
- Maintaining pipes, drains, and control structures
A well-built pond requires less work and lasts longer.
Ready to Build It Right the First Time? Bulletproof Pond & Lake Has You Covered
By now, you understand how pond construction really works, what steps matter most, and how smart planning protects your pond from leaks, erosion, and expensive fixes later.
You also know how the right design and construction process saves time, money, and frustration over the life of your pond.
When you are ready to move from planning to building, the pond contractors at Bulletproof Pond & Lake can handle every phase of your pond construction, from site evaluation and design through excavation, dam construction, and long-term performance.
Call or fill out the contact form to talk through your property and find out what is possible before the ground is ever touched.